Wednesday, August 30, 2023

Haystacks!!! No-Bake Treats (easy to make Gluten Free )

1179 views 
3/29/10 published

EDIT: Rice Krispies Brand cereal has malt flavoring, which is not a gluten free item. Gluten Free toasted rice cereal can be found at many grocery and health food stores.


~~~~~~~~~~~~~~~~~~~~~

"Haystacks", always said around the holidays, and in the form of a sigh, like an elusive memory, distant but pleasant. As far as I can tell, it all started with my son's Great Grandma Brashear (R.I.P.). Everyone in our family talks about her Haystacks to this day, and its been many years since she made them.

This is my own recipe as I couldn't locate the original (hence the sighs and longing); pieced together from talking to family members and reviewing all the recipes online I could find - took me a couple of years; speaking for myself,  it was well worth the effort.

Speaking in general terms, a haystack is a combination of: dry-good treats like cereal, sweetened coconut, melted chocolate-type candy, and nut butter. It can be modified in almost any direction you like. Following are the two most popular combinations I have tried thus far. The Classic mimics Great Grandma Brashear's original cookie.


UPDATE: These cookies have been added to the standard cookie selection at the Country Club I work for, and we have even had visitors in the kitchen requesting the recipe. As well, has turned out to be a fun activity to do with children too young to bake but interested in creating food.

The Classic Haystack: 

4 cups Rice Krispies cereal
1 cup sweetened shredded coconut
11 ounces  butterscotch chips 
1/2 cup creamy peanut butter

Combine cereal and coconut in mixing bowl, stirring to combine evenly.

Melt butterscotch chips and peanut butter in the microwave, on medium heat. Heat for 1 minute, stir with a rubber spatula, cleaning butterscotch from sides of bowl, and continue to cook and stir in 30 second increments until melted and combined, about 2 - 2.5 minutes. Mixture will be very silky looking!

Pour melted butterscotch mixture over the cereal mixture, and gently combine using the rubber spatula again. When all of the cereal mixture is coated, you are done preparing the Haystacks cookie mixture.

Using a cookie scoop or two tablespoons, drop cookie mixture onto sheet pans lined with wax or parchment paper.

Place sheet pans  in refrigerator until firm, then the Haystacks can be stored in ZipLoc bags or in Tupperware style storage containers, in the fridge, for up to two weeks. As well, they are delicious frozen, or thawed out again!


The "Almond Joy" Haystack:

4 cups Rice Krispies cereal
1 cup sweetened shredded coconut
12 ounces semisweet chocolate chips 
1/2 cup crunchy almond butter

Combine cereal and coconut in mixing bowl, stirring to combine evenly.

Melt chocolate chips and almond butter in the microwave, on medium heat. Heat for 1 minute, stir with a rubber spatula, cleaning chocolate from sides of bowl, and continue to cook and stir in 30 second increments until melted and combined, about 2 - 2.5 minutes. Mixture will be very silky (and bumpy!) looking.

Pour melted chocolate mixture over the cereal mixture, and gently combine using the rubber spatula again. When all of the cereal mixture is coated, you are done preparing the Haystacks cookie mixture.

Using a cookie scoop or two tablespoons, drop cookie mixture onto sheet pans lined with wax or parchment paper.

Place sheet pans  in refrigerator until firm, then the Haystacks can be stored in ZipLoc bags or in Tupperware style storage containers, in the fridge, for up to two weeks. As well, they are delicious frozen, and/or thawed out again!

SCALING NOTE: If you work in a restaurant or ever need to make large batches, you can successfully quadruple this recipe, just melt the chocolate/nut butter over a double boiler, use an ice cream scooper of your desired size (otherwise your hands will seriously tire), and keep the mixture in a bowl over warm water (the base of the double boiler will suffice - off heat!) while you scoop them out (otherwise they will start to solidify before you're done, not fun).

Wednesday, May 17, 2023

The OG Chia Rainbow Smoothie

This has been a pantry and blog staple for over a decade now! Reposting  because I still get requests for this simple and delicious treat.

——

Frozen fruits make smoothies amazing and affordable; if you haven't tried them I highly recommend you do! Of course I believe in eating seasonally and locally, but sometimes other options are needed, for a variety of reasons.

I strongly believe in "eating from the rainbow",  preferably daily. The reasoning behind this passion lies in the fact that the colors in fruits and veggies have different and unique health properties. By eating a variety of different items, a more complete nutritional  profile emerges as a whole.

I ground my dry chia seeds this time, instead of adding the hydrated chia pearl gel. I have a small grinder that I use for grinding seeds, such as chia or flax. They are available for about $10 and if you are serious about the nutritional value of seeds, you should get one. Although there are ground seed options on the shelf available for purchase, they go rancid much quicker in that state. It is best to keep your seeds frozen in their whole state, grinding them only as needed.

This smoothie was very tropical and satiated my hunger for hours. I procured all items from my local Trader Joe's except the yogurt. You can sub out different flavors/fruits for all of the items listed, as you prefer.

Rainbow Smoothie (approximately 16 ounces)

1 cup Mountain High Vanilla yogurt
1/2 cup frozen  mango chunks
1/4 cup frozen pineapple chunks
1/4 cup pomegranate blueberry sorbet
1 tablespoon whole chia seeds, measured and then finely ground

Add all ingredients to blender. Blend until smooth. Add water if you prefer a thinner smoothie.

11/29/10

via Chia Mama

Monday, July 4, 2022

Red Velvet Cupcakes with Neu-Creamy Frosting

Happy St. Patricks Day! 
I think these cupcakes would look lovely in Saint Patrick's Day themed liners too! Or better yet, sub the red coloring for green. Originally this was to be for Fourth of July; I still have the liners, so maybe I should post a picture when the time comes to make them again this summer.


Red Velvet Cupcakes with Neu-Creamy Frosting
With the Fourth of July just around the corner, and the cupcake craze beyond its peek, I am seeing nifty cupcake liners in fun Patriotic patterns, on the shelves of just about everywhere. Just like the red, white and blue colors of our flag, there are three specialty items that may or may not be part of your regular pantry, but it will be well worth adding them: Dutch processed cocoa, red food coloring, and American Neufschatel cheese.

* If Dutch-processed cocoa is hard to find, you may create a perfect replacement; simply sift 3 tablespoons natural cocoa powder with 1/8 teaspoon baking soda. Stir, and store the extra in a spice jar until you need it again.

Red Velvet Cupcakes:
½ cup whole milk
1 tablespoon liquid red food coloring
1 ½ teaspoons distilled white vinegar
1¼ cups cake flour
1 tablespoon Dutch-processed cocoa powder*
¼ teaspoon salt, Himilania or kosher
¼ cup unsalted butter, at room temperature
¾ cup granulated white sugar
1 large egg, at room temperature
½ teaspoon pure vanilla extract
½ teaspoon white distilled vinegar
½ teaspoon baking soda, sifted


Preheat oven to 350 degrees.

Prepare buttermilk/wet ingredients: I recommend using glass for this step, as it repels the food dye. In a small bowl or measuring cup, whisk together: milk, food coloring and vinegar. Allow to stand at room temperature for fifteen minutes and stir before using. This in order to allow the milk fats to curdle into a homemade buttermilk, one of the secrets to the moist crumb. Not-fat milk will not curdle. (You may also just use ½ cup store bought buttermilk in place of the milk and vinegar. )

Prepare Cupcake Liners: Line muffin tins with 12 foil liners. Set aside.

Prepare the dry ingredients: In a small mixing bowl, sift together the flour, cocoa powder and salt, set aside.

To make the cupcake batter, use a standing mixer fitted with the paddle attachment.

Place the butter in your mixer, and on medium speed, beat until soft, about 2 minutes. Scrape down the sides of the bowl with a rubber spatula. Add the sugar, and continue beating on medium speed until they have fully incorporated, about 2 minutes; the butter mixture will lighten in color and appear fluffy. Add the egg, and continue to mix until combined. Finally, add vanilla extract and scrape down the sides of the mixing bowl with the rubber spatula. Turn mixer to low.

With the mixer still on low, add 1/3 of the dry ingredients to the butter mixture, then add 1/2 the wet ingredients. Add another 1/3 of the dry ingredients and the rest of the wet. Finally, add the rest of the dry ingredients and turn off mixer, removing from stand.

On a small saucer, pour vinegar. Sift baking soda over it, and mix with a fork until it bubbles. With a rubber spatula, fold the foam quickly but gently into the batter.

Fill cupcake liners half full with the batter. Gently smooth the top of the batter with the back of a spoon. Bake on the center rack of your preheated oven for 10-12 minutes. Test with a toothpick by inserting into the center of the cupcake; when it comes out clean, they are done.

Cool for 5 minutes in their tins, then place on a cooling rack. When completely cool, place cupcakes back into their tins or on a platter, and wrap with plastic wrap. Place in refrigerator for one hour. This step will assist in successfully frosting the cupcakes.


Neu-Creamy Frosting
8 ounces American Neufchatel cheese (usually located next to cream cheese, and is often marketed as a "healthier alternative")
¾ cup whipping cream
½ cup powdered sugar, sifted
¾ teaspoon pure vanilla extract


Using a food processor or mixer, process Neufchatel until smooth. Add sugar and vanilla. Set aside.

In a small bowl, whisk the heavy cream until stiff. Fold into Neufchatel mixture and set aside. Refrigerate if a firmer consistency is desired for decorating with an offset spatula.

Place frosting in piping bag or storage bag, and cut a ½ inch opening.

Starting at the center of each cupcake, create a spiral of frosting, leaving a ½ border of red cupcake showing through. Sprinkling with silver nonpareils is optional, I haven’t had any luck finding them around here as of late.


Sunday, August 13, 2017

Thyme For Beans!

All dried beans are not created equal, at least in my experience with the pinto. I have made this recipe with many different brands of this prevalent bean, which varies in size from 1/2" to 3/4" long.

In my experience, the small compact beans retain their shape more so than the larger pinto beans, which tend to dissolve more, resulting in a more "refried bean" texture. I have not found why some are small and some are large, yet they are all called pinto. In any event, the end results are always delicious.

If you have yet to use dried pinto beans, please be aware they need to be cleaned and sorted. You can do this by putting all of the beans in a bowl, with a colander next to it. Pick out a handful of beans, spreading them out in your palm; remove any small pebbles or shriveled beans and place the sorted beans in the colander. I personally find this process relaxing and a bit meditative, and I also use the time to infuse them with love and good intentions.

I also use this recipe for black beans. Herbs and aromatics can be modified by your taste or what you have on hand.

Thyme For Beans!

Thyme is a delicious addition in this easy to make, healthy side dish.

1# pinto beans
11 cups water
3 branches thyme
1 cup white onion, diced
1 teaspoon granulated garlic powder
½ teaspoon ground cumin
1 teaspoon Kosher salt
½ teaspoon Adobo (or ¼ tsp kosher salt and ¼ teaspoon granulated garlic powder)
lime juice, optional, to taste
hot sauce, optional, to taste

Sort beans as directed.

Rinse beans under cold water until the water runs clear.

In a large stockpot, add beans and water. If you have a pasta cooking pan with colander insert this is a perfect time to use it! Bring to a boil and cook uncovered for 2 minutes. Remove from heat, cover, and soak for 1 hour. This is called a "quick soak" and reduces the amount of gas-causing substances in the beans. Drain and rinse with fresh water.

Return stockpot to heat, cover beans with fresh water and add thyme, onion, garlic powder and cumin. Bring to a boil.

Reduce heat and simmer approximately 1 ½ hours, or until tender, stirring and checking tenderness every thirty minutes. When the beans are tender, they are done!

At this point, add salt and Adobo to taste, allow salt to incorporate at least 15 minutes before adding more. Do not add salt or other acids like lime juice or hot sauce until beans are tender, as they inhibit the beans from softening during cooking.

Cool in a shallow container in the refrigerator if to be eaten at a later time. Freeze uneaten beans after 3 days - perfect for soups or veggie burger prep!

Yields about 6 delicious cups of beans.

Modified from recipe originally published September 21, 2010

Saturday, January 28, 2017

Finishing Salts

Over the years I have hunted in every nook and cranny, in nice shops and little dives, for a new salt adventure. When Halen Mon, the first flake salt I ever had, passed my lips, it was love at first bite.

People are always asking me for reliable brands of salts to purchase. I have had many, many “special” or “boutique” salts as I call them, over the years, most of them excellent. But when talking about widely available, reliable and consistent products, I have a short list. I hope that you find it of some use.

Celtic Sea Salt: Sea Salt. Superfine grain, very moist in texture, amazing with steamed broccoli and sweet butter, on popcorn, cooked with grains. High mineral content.

Diamond Kosher Salt: Not technically a finishing salt, but a good substitution for table salt, even at the table!

Fleur de Sel de Guerande
: "Flower of the Sea" Sea salt. Delicate, small crystals, exquisite with fish, steamed vegetables, cream sauces and as an ingredient in pastries. The "de Guerande" portion on the label is very important - it is the only one hand harvested; other companies that claim the Fleur de Sel name mechanically harvest by scraping the tops of sea salt beds, a very different process. "de Guerande" is hand harvested with wooden paddles, and only the free floating flakes of salt in the sea are used.

Halen Mon (Pure, Celery, Vanilla): Flake sea salt. Halen Mon is in my opinion the crème de la crème, the ONLY gourmet finishing salt you must have, and you must have it. MUST. I have a little bowl on the dinner table, at all times. Hand harvested in the Atlantic waters that surround the Welsh Isle of Anglesey, Halen Mon has a distinct flavor that is truly a pleasure. The Pure is fantastic on steaks, salads, cheeses, fish, poultry, melon and even the occasional desert! Vanilla pairs amazingly with strawberries (of course!), maple breakfast sausage links (I swear!) and crushed, even makes a nice rim garnish for a cocktail. The Celery salt is unique, and livens up every single veggie and chicken plate I’ve tried it on, and is the star of my next truffle experiment. It should be noted that there also exists smoked flake salt, a blend with organic spices, and a lighter flaked pure version; I have not tried them yet, but I'm sure they are amazing.

Himilania Pink Salt: Imported mineral salt. Available in the form of a whole rock, and in a variety of granulations. I recommend the rock for shaving tableside, fine for cooking and baking. The trademark pink coloring is derived from the high mineral concentration. I use it for all baking recipes, and sparingly in place of table or kosher. Pretty, nutritious and delicious!

Jane’s Krazy Mixed Up Salt: Proprietary salt and seasoning blend, low in sodium, a delicious everyday-at-the-table option.

Maldon: Flake sea salt. Delicate, melts nicely on meats, excellent sprinkled on caprese salads and roasted vegetables, a more widely available all-purpose flake salt. Buy this is you can't find Halen Mon, you won’t be disappointed!

Real Salt: Domestic mineral salt. Granulated texture, white with specks of color derived from the high concentration of minerals that are present. Similar to the pink salt in flavor/mineral makeup (more earthy than a sea salt). Fantastic on root vegetables.

It goes without saying that too much of anything is a bad thing, and this holds true particularly with salts! Remember, you can always add more, but you can't take it away.

Copied from text originally published October 22, 2009

Chia Mama Chia Pearl Oatmeal


Gluten free and delicious! Stir in two tablespoons chia pearl gel with your morning oatmeal, add a little honey and regular or rice milk, and you have started your day off a lot better than you would have with a fast food breakfast.

Coped from text originally published November 17, 2010

Chia Mama Believes Chia Water Comes To The Rescue!!!

 
Just a quick personal testimonial - it's been too long.  Late Friday evening I was exposed to a flu from my son after taking care of him all night. Then on Saturday morning, after going into work to setup and help cook for a Country Club buffet luncheon, I contracted it. At first we thought it was just the common cold, but,  "Noooo", this was a full blown Flu. As such,  I have been unable to eat much for way too long!

Thankfully I drank chia water, and tried snacking on fruits and veggies, but really its the chia that got me through.

Which reminded me of something I always want to share, but gets side-barred far too often. One of my beliefs as a food educator is to encourage Mindful Eating. I recommend this more than any ingredient. So many times we eat for the wrong reasons! When you start your day with chia water, as long as you choose healthy foods for that chia to distribute to the rest of the body during the day, you will know you are well fed. After some time, you will find that you don't necessarily need the fixes obtained from food culprits such as: sugar, caffeine, or even the rush of filling emotional voids with your favorite comfort food. You may also gain a healthier outlook when you do choose an occasional food indulgence.

Chia seeds made this possible for me, and that is one of the many reasons why I have been trying to share their amazing properties since 2006 when I was first introduced to this amazing "Superfood". Chia has an amazing amount of Omega-3 fatty acids, way more than salmon or flax, in their tiny hydrophilic bodies, as I learned in my studies at Bauman College in Berkeley, CA. Back then, I thought, "these little guys are miracles!" and honestly, I have felt that way ever since. I don't have a thyroid, suffer from hypoglycemia and have a soy intolerance. This is made all the more bearable because if I can't find an appropriate food, I can always drink chia water.

I hope that you too find a way to connect with food and your body, in a mindful way. For me, I am a Chia Mama through and through!

Namaste!

Originally published March 15, 2011

Vanilla Chia Pearl Gel Pudding

This is an incredibly satiating snack and really hits the spot for a sweet tooth craving! Easy to prepare, and simply delicious!
 
 
1/2 cup dairy free milk
1 tablespoon whole chia seeds
1 teaspoon vanilla extract
1/2 teaspoon brown cane sugar
 
Combine all ingredients in a small bowl (or teacup!) and whisk occasionally for a minimum of fifteen minutes. May be stored in fridge in a covered container for up to 24 hours. Whisk well prior to serving.

Serves 1 as a snack or dessert.
 
Copied from my original recipe published May 25, 2015

Tuesday, January 24, 2017

Chia Pearl Gel

I'll make this quick, because if you're here, you're likely looking for one thing - how to prepare chia seeds for consumption. I think chia seeds should be hydrated prior to eating/drinking, so they don't hydrate in your system. This is the method I employ and have shared with others, to their success. Because this works for me doesn't always mean it will work for you. Look at your medical history, as when adding any new food to your diet. Are you allowed to eat nuts and seeds? etc.  

Chia Pearl Gel

Whisk 2 tablespoons dry chia seeds into 2 cups of water; let sit for 15 minutes, whisking occasionally, until the chia seeds have formed a soft gel.  You can also combine seeds and water in a bottle or container, and shake intermittently for fifteen minutes. When you look closely, you will see the gel is comprised of the hydrated chia pearls. Refrigerate chia pearl gel until ready to use. I recommend keeping the dry seeds in the freezer.


Chia Water
As a supplement to your regular diet, combine 2 tablespoons chia pearl gel with 2 cups water.  Fresh squeezed lemon juice from 1/2 lemon is recommended, if available. You can prepare this in advance in a water bottle.

~~~~~~~~~~

So this is what I do to regulate my blood sugar and keep my weight in the healthy range;  I make a pearl gel with chia seeds and water, and keep it on hand to use in foods and water. I know that when I start my day with a bottle of chia water, that chia is supplementing any food I eat with fiber, calcium, and Omega-3 fatty acids, all the while keeping me hydrated.

I eat less because chia satiates my appetite. I also tend to choose better foods, knowing there's chia in my stomach, at the ready to distribute whatever it is I choose to eat! That means good fats like avocado or salmon, natural sugars from whole fruits, etc.

About me: I don't have a thyroid, am prone to low blood sugar, and am a "bad food" addict. I can't tolerate many soy products. I am able to eat nuts and seeds, grass fed meats and of course, fruits and veggies. Shouldn't that be enough?!?

(I will post new ways to use your Chia Pearl Gel as often as possible! I am presently enjoying Navitas Naturals brand, organic and non-GMO, available at the link above)

Copied from my original recipe published November 15, 2010

Chia Pearl Vinaigrette

Almost everyone has a favorite vinaigrette, or Italian style dressing. Adding chia pearls to your favorite dressing right before serving is absolutely delicious! (I mostly use the basic shallot/dijon/aged sherry  or red wine vinaigrette, so if you try with a ranch or caesar type dressing, please let me know your thoughts on taste/texture!)

Revised from my original recipe published November 16, 2010

Sunday, December 18, 2016

Banana Almond Milk - Dairy Free

 
This is truly a unique and delicious dairy free milk!
 
1 cup whole raw almonds
1 dehydrated baby banana
3 cups filtered water
 
Combine all ingredients in 4 cup covered container before you go to bed, or eight hours in advance of preparation. Refrigerate.
 
Strain, discarding soaking water. Place nuts and fruit into high speed blender. Add 4 cups fresh filtered water.  Start blender on lowest setting, and gradually increase speed to the highest setting, continuing to process for 1 minute.
 
Place nut milk bag in 4 quart container , ensure it is stationary, and pour contents of blender into the nut bag.
 
Hold the top of the bag closed with your left hand and bring your right hand down the bag, compressing to harvest your banana almond milk. I find treating the bag like an accordian fan works better than twisting, plus it will last longer and be easier to clean. .  Repeat process and with minimal effort your milk will be strained within a minute.


Rinse your blender, nut milk bag, and all equipment immediately, according to manufacturer instructions!
 
Yield: 4 cups milk
Prep Time: 1 minute
Soak Time: 8 hours
Processing: 3 minutes
Storage: Refrigerate and use within 3 days

Recipe modified from my original publishing of "Banana Almond Milk - Dairy Free" May 23, 2016

Saturday, December 17, 2016

Almond Walnut Dairy Free Milk


I prefer to prepare almonds and walnuts for consumption by soaking them in filtered water for 8 hours, and I'm pretty specific about it. From what I've gathered from published articles, cookbooks and textbooks, people have varying theories, with 2 - 8 hours being the most common time frames. If you are new to making dairy free milk check out the tips at the end of recipe for more specific information.
 
3/4 cup whole raw almonds
1/4 cup whole raw walnuts
1 small pitted date
3 cups filtered water
 
Combine ingredients in 4 cup covered container such as before you go to bed, or eight hours in advance of preparation. Allow to soak in cool dry place for eight hours.

Remove/strain nuts from soaking water, and place in blender.  Add 3 cups fresh filtered water. Cover blender and gradually increase speed to the highest setting, processing for 1 minute.
 
Place nut milk bag in 4 quart container and pour contents of blender into the nut milk bag.
 
Hold the top of the nut milk bag with your left hand and, starting at the top, bring your right hand down the bag, gently compressing, and harvest your milk. I find treating the bag like an accordion fan works better than twisting and squeezing. With minimal effort your milk will be strained within a minute.
 
Rinse your blender and all equipment immediately, to save yourself from difficult to clean messes.
 
Yield: 4 cups milk
Prep Time: 1 minute
Soak Time: 8 hours
Processing: 3 minutes
Storage: Refrigerate and use within 3 days

Some general tips and information: For milk preparation, after soaking the nuts I drain them and  prepare with fresh filtered water in my Vita Mix 5200 for 1 minute. On this point too, recipes vary widely  from 1 to 4 minutes.  You want to have the almonds at an almond meal state when you stop, so when you see sand-sized bits of almond whirling around in the blender, you are done. Please note that my Vita Mix is fantastic. You may have a better model or one that is not as powerful, so you will need to find your own "sweet spot" as far as blending time. If in doubt but you feel the milk warming, you can feel free to stop!
 
As for straining the nut milk, I use a 4 quart container and an extra large food grade nut milk bag.
 
For storage of the finished product I use a four cup mason jar.
 
Nut milk is naturally perishable so you want to refrigerate it, if not drinking or using immediately. If, like me, you over process the ingredients while figuring out your blender, and the milk is warm, let it cool before straining, and then let the strained milk cool completely before refrigerating.
 
As you are cleaning up, wonder a bit how they get that nut milk to last on the grocery store shelf, and what happens to that container it's in once you've thrown it away. Follow up with some research or a call to your garbage company for proper recycling information if so inclined. It makes the whole process that much more satisfying and educational.
 
Modified from my previous publishing prior to 2016

Seasonal Soup Stew

 
This seasonal soup stew is very simple to prepare, and the final outcome packed with warming gusto. It is very forgiving as far as modifications and substitutions. I encourage you to swap out like items in the same ratios, and please let me know how it goes. I love new combination ideas.
 
Grass-fed soup bones make a delicious and far superior health wise, base for soup; and with some research you can often find humane farmers in your area. Marin Sun Farms is a fantastic example. I love their counter in Rockridge, CA - many grass-fed and pastured options, and beautiful bones just for soup. The knowledgable and friendly staff are the best I have found in my area! Please let me know of your favorite local humane butcher in the comments.
 
6 cups filtered water
1 grass-fed soup bone (ask your butcher - and if you don't have a butcher friend, you need one...go make one)
1/2 pound chuck roast, cubed into 1/2" pieces
2 cups canned or fresh diced tomatoes
2 cups diced russet potatoes
1 cup peeled and diced sweet potatoes
1 cup diced carrots
1 cup diced onions
1 bay leaf
2 cups fresh green beans, cleaned of vine tip and cut into 1" pieces
1 cup shelled peas
1/2 cup chopped roasted red bell peppers
1 teaspoon Himilayan or kosher salt
1/4 teaspoon ground black pepper
1/4 teaspoon granulated garlic
1/8 teaspoon ground cayenne pepper
3 cups shredded green cabbage (1 small cabbage)
1/4 cup chopped parsley
salt and pepper to taste
 
In a 10 quart stockpot, combine water, soup bone and chuck roast. Bring ingredients to a slow boil, and immediately turn heat down to a simmer.
 
Continue to cook until meat is tender, about 1 1/2 hours, skimming froth from the surface and stirring ocassionally.
 
You may remove meat and continue to simmer bone for another hour, if you have time, and for added nutrients.
 
Remove soup bone and add tomato,  russet and sweet potatoes, carrot, onion, and bay leaf. If you removed the beef, it is time to add that back into the pot as well. Simmer until carrot and potato are tender.
 
Add  green beans, peas, roasted red bell pepper, salt, pepper, garlic, and cayenne. Add enough water to cover ingredients, if necessary.
 
Stirring gently, add cabbage and parsley, and continue to simmer until all ingredients are tender. Check seasoning and add sparingly if needed,  allowing a few minutes of cooking time for additions to fully develop their flavor.
 
Remove bay leaf, and serve.
 
Freeze leftovers, or make specifically for that purpose in the first place!

~ 8 generous portions
 
Recipe modified from my original publishing of "Stone Soup" in March of 2012
 

Tuesday, December 13, 2016

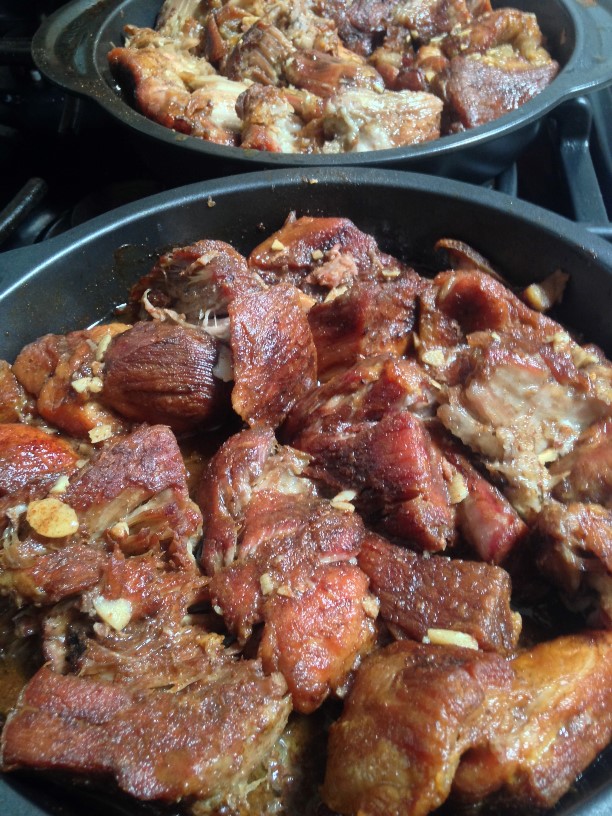
Sweet and Spicy Carnitas


This recipe calls for ground spices, as using them allows the spice to penetrate the pork  as it braises, so you get all of the wonderful flavors, both inside and out.

My signature Sweet and Spicy Carnitas is my favorite food with which to feed "the band", or any large group of people! This dish I believe is the most requested savory food that I make. I think what makes it special is the combination of searing, open braising, the braising liquid and adding garlic in the final hour of cooking.  And of course, love - the final and most important ingredient!

Traditionally, carnitas are pretty simple - melt in your mouth pork; always a good thing. In some areas of Mexico, a variety of whole spices are added to the braising liquid to lightly infuse the meat with the essence of spices such as cinnamon, oregano, and thyme. Carnitas are also very similar to shredded Puerto Rican pork, a dish I had a few times during special occasions while growing up.
 
2 cups water, plus more as needed
1 tablespoon ground cinnamon
1 tablespoon Adobo, or granulated garlic
1 tablespoon ground cayenne pepper
1 1/2 tablespoons ground cumin
6 pounds boneless pork shoulder, cut into approximately 3 inch cubes
2 teaspoons Kosher salt
1 tablespoon vegetable oil
6 cloves garlic, thinly sliced
limitless love

Preheat oven to 350 degrees.

Mix water, cinnamon, Adobo or granulated garlic, cayenne pepper and cumin until fully incorporated and set aside.

Rub surface of pork with Kosher salt.

In a large, high sided skillet, sear pork in the vegetable oil, on all sides, until crispy and dark golden brown. This may have to be done in batches, depending on the size of your skillet. Remove pork onto cooling rack, or plate, and blot to remove excess oil. Remove fats from pan.

With caution, pour water with braising spices into the pan, which will cause lots of steam! Stir to remove all the bits of goodness from the bottom of the pan. Continue to cook for three minutes, stirring. This allows the spices to cook and develop before infusing the meat.

Place pork back into the pan with the braising liquid. Pour enough fresh water to come 2/3 the way up the sides of the pork (usually about 4 – 5 cups total liquid). If your pan is too small, you may instead distribute the brasing liquid and meat into how ever many baking dishes is necessary, add fresh water as directed above.

Braise in the oven for 3-4 hours, uncovered, turning meat every hour. At the start of the third hour, add garlic to the braising liquid.

To test the carnitas for doneness, press down on the meat with a large kitchen spoon; if it collapses and falls apart, it is  done. When youve reached this stage, remove pan from the oven, and break pork into 1" – 2” pieces.

At this point, you may do what I do, and reserve the cooking liquid, draining of fat,  and serve it on the side. It is delicious on rice!

Or you can return carnitas and liquid to oven and continue cooking, turning occasionally, until almost most or all of the liquid has evaporated and the peaks of the pork are deeply caramelized. This could take an additional hour. As depicted in photo.

Revised from my original recipe published September 20, 2010

Chocolate Chip Oatmeal Cookies


Having simple and healthy snack recipes that you also find delicious translates into success in a couple of ways.  You can make homemade foods that are far superior to their processed counterparts, while budgeting your costs. Plus, you always have something personal to gift others- nothing like sharing good food made with love!
 
Some interesting differences in this recipe from other cookies are found in the ingredients:
 
~ By replacing the eggs with chia seed gel, you are replacing that cholesterol with an excellent source of Omega-3 fatty acids, fiber, and calcium.
 
~ If you can find grass-fed butter, it is a better source of fat, in part due to its high vitamin K content.
 
~ Not only is the salt greatly decreased from most recipes and completely optional, but replacing table salt with a mineral salt like Himalayan pink or Real Utah is better tasting, and better for you since it retains many necessary vitamins and minerals.
 
~Sucanat, or other unrefined dehydrated cane juices, add another dose of minerals lacking in cookies made with all refined/brown sugar. If sucanat is not available in your area, I have long suspected other brown unrefined sugars such as coconut sugar could be interesting. As well, sugar in the raw or regular brown sugar can be used in its place.
 
~ Similarly, graham flour and almond meal cut the amount of refined flour content and increases the overall nutritional value. Many whole grain flours will work in place of graham flour; I have tried spelt, oat, white whole wheat, and whole wheat pastry, all successfully. However, I implore you to ask your grocer or shop online for this flour - it really gives that "takes you back" flavor and texture.
 
~ Guittard milk chocolate chips are my favorite in all the world.  Like See's candy? That's Guittard chocolate you bite into when you have one of their chocolate covered candies. Made in Burlingame, CA and non-GMO.
 
chia seed gel (egg replacer)*
1 cup unsalted butter
1 cup all purpose flour
1/4 cup graham flour (or other whole grain flour like white whole wheat, spelt, etc. )
1/4 cup almond meal flour
1 teaspoon baking soda
1 teaspoon ground cinnamon
1/4 teaspoon salt (Himalayan pink fine grain, Utah Real fine grain, or Kosher), optional
1/2 cup light brown sugar, packed
1/2 cup cane sugar
1/4 cup sucanat (or other unrefined or regular brown sugars)
1 teaspoon pure vanilla extract
3 cups Quaker 1-minute quick oats
6 oz. Guittard milk chocolate chips  (1 cup)
 

*chia seed gel (egg replacer)

1 T organic chia seeds 
1/4 cup water
Add chia seeds to water in a container with lid. Shake or stir a few times, allowing to "bloom" for 15 minutes, set aside. This step should be done while preparing the ingredients.
 
This is also a good time to bring butter to room temperature before starting. Twenty minutes is generally a good amount of time - the butter needs only to yield to the pressure from one finger to be sufficiently softened.

Place baking rack in center of oven and preheat oven to 350 degrees.

Prepare standard sized cookie sheet by lining with parchment paper. Set aside.
 
In a small bowl, combine all flours, baking soda, cinnamon, and optional but recommended salt. Whisk until incorporated, and set aside.

Using a stand mixer, install the paddle attachment. Place butter and sugars in the mixing bowl, and turn speed to "medium". Cream the butter and sugars together until fully incorporated and slightly fluffy - this will take about four minutes.  To ensure even mixing, stop the mixer and scrape down the sides of the mixing bowl with a spatula at the two minute mark.
 
Turn speed on mixer down to "low" and add chia seed gel, mixing until evenly distributed, under a minute. Stop mixer and scrape down the sides of mixing bowl.
 
Continuing to mix on speed "low", add vanilla extract.

Continuing to mix on speed "low", add 1/2 cup of the flour mixture at a time, briefly increasing and then decreasing the speed to fully incorporate the flour, without overworking the dough.  Turn off machine and scrape down the sides of mixing bowl. 
 
Continuing to mix on speed "low", add oats 1 cup at a time, briefly increasing and decreasing speed to fully incorporate, without overworking the dough.
 
Turn speed on mixer to "stir", and add in chocolate chips. This should only take about twenty seconds. Remove bowl from mixer and stir the dough by hand with a spatula if needed, until evenly incorporated.

Using a
#40 sized cookie scoop (1 2/3 tablespoons), or two spoons, place mounds of cookie dough on cookie sheet, with a couple of inches of space between them.

Note: If the dough is very soft at this stage and does not retain its shaped when scooped,  refrigerate for fifteen minutes, or until slightly firm. This will help the cookie dough release from the cookie scoop or spoons more easily, and will help the cookies retain their shape while baking. A too-soft cookie dough will spread undesirably when baking, that much is guaranteed.

Flatten each scoop gently with your fingers to about 2/3 inch thick; there will now be about 1 inch of space between the cookies. A standard sized cookie sheet will hold one dozen cookies (3 cookies vertically x 4 cookies horizontally).

 
Bake for 8 minutes and rotate the pan. Check for doneness in 4 more minutes. 
 
If cookies still appear puffed and moist, continue to cook for at least another minute. They are technically finished after the cookies fall a bit, and the exterior of the dough looks dry.  You can continue to bake to desired darkness. Cookies will vary from chewy to crispy, depending on baking time. The longer they bake the crispier they will be when cooled. When cooled, the lighter cookies will be brown around the edges with a soft and chewy center, and the darker will yield a more uniformly caramelized and crispy treat. (All shades are delicious, and I often cook each sheet pan differently, on purpose, knowing that people have different preferences.)

Store in an airtight container, or in the fridge for up to one week.

If you don't need all the cookies at once, you can flash freeze the unbaked dough. To do this, portion the dough onto a cookie sheet. There is no need to allow space in between them since you are not baking them. Freeze for an hour, or until they are solid. Then they can be transferred to a freezer bag to save room.

When ready to bake, bring to room temperature, generally about twenty minutes, and proceed with baking as directed.

Yield: Three+ dozen

Revised from my original "Breakfast Cookie" recipe published April 24, 2012

Monday, December 12, 2016

Brown Sugar Candied Walnuts


These candied walnuts are lightly sweet with a delicate and crispy "shell", delicious eaten out of hand. Also adds dimension and texture when added to any mixed green salad, especially one that includes sliced apples or pears and blue cheese. Or break them up and use as a coating for candies, sprinkled in yogurt, or on top of ice cream. 

3 cups water
1 cup light brown sugar
2 cups whole walnuts
3 tablespoons powdered sugar

Line small sheet pan with parchment paper and set aside.

Combine water and brown sugar in a 3 quart saucepan. Bring to a boil over high heat, stirring to dissolve sugar. Reduce heat to medium, and add walnuts. Stirring every ten minutes, continue simmering for 30 minutes. Remove pan from heat.

Place baking rack in center of oven. Preheat oven to 325 degrees.

Remove walnuts with slotted spoon, and place in a medium mixing bowl. Discard remaining sugar water. Sprinkle powdered sugar over walnuts, one tablespoon at a time,  mixing gently to ensure sugar is dissolved before adding the next. Once all sugar has been incorporated, pour walnuts onto prepared sheet pan and arrange in a single layer. Bake for 20 minutes, stirring halfway through cooking time.

Remove parchment and walnuts from pan and allow to cool completely, about 30 minutes.

Store walnuts in an airtight container at room temperature.

Revised  from my original recipe previously published

Saturday, December 3, 2016

Chocolate Sea Salt Cookies

 
People of all ages love this modern take on the classic chocolate chip cookie. The overall nutritional profile of this anytime treat is boosted with the addition of whole grain flours and mineral salt. There is no "extra" salt in this recipe, however the type of salt is more pronounced in flavor, due to the natural minerals. Small bits of chocolate balances the toothsome texture with a sweet and salty finish.  
Also known as "Circles of Love".
 
1/4 cup graham flour
1 teaspoon baking soda
1 scant teaspoon Himalayan salt, fine pink
1 teaspoon ground cinnamon
1 cup butter
3/4 cup Florida Crystals cane sugar
3/4 cup brown sugar
2 large eggs
1 teaspoon pure vanilla extract
1 cup nuts of your choice, optional

Bring all ingredients to room temperature before starting. Twenty minutes is generally a good amount of time - the butter needs only to yield to the pressure from one finger to be sufficiently softened.

Place baking rack in center of oven and preheat oven to 350 degrees.

Prepare standard sized cookie sheet by lining with parchment paper. Set aside.

In a medium mixing bowl, combine all flours, baking soda, salt and cinnamon, whisking briefly, and set aside.
 
Using a stand mixer, install the paddle attachment. Place butter and sugars in the mixing bowl, and turn speed to "medium". Cream the butter and sugars together until fully incorporated and slightly fluffy - this will take about four minutes.  To ensure even mixing, stop the mixer and scrape down the sides of the mixing bowl with a spatula at the two minute mark.

Turn speed on mixer down to "low" and add one egg. As the egg pulls away from the wall of the mixing bowl, stop the mixer and scrape down the sides of the bowl. Continue mixing on "low", allowing to fully incorporate. Repeat with the second egg.

Add vanilla extract.

Continuing to mix on speed "low", add 1 cup of the flour mixture at a time, briefly increasing and then decreasing the speed to fully incorporate the flour, without overworking the dough.  Turn off machine and scrape down the sides of mixing bowl. 

Turn speed on mixer to "stir", and pour in the chocolate chips, and optional nuts. This should only take about ten seconds. Remove bowl from mixer and stir the dough by hand with a spatula, until they are all evenly incorporated.
 
Using a #40 sized cookie scoop (1 2/3 tablespoons), or two spoons, place mounds of cookie dough on cookie sheet, with a couple of inches of space between them.

 Note: If the dough is very soft at this stage and does not retain its shaped when scooped,  refrigerate for fifteen minutes, or until slightly firm. This will help the cookie dough release from the cookie scoop or spoons more easily, and will help the cookies retain their shape while baking. A too-soft cookie dough will spread undesirably when baking, that much is guaranteed.

Flatten each scoop gently with your fingers to about 2/3 inch thick; there will now be about 1 inch of space between the cookies. A standard sized cookie sheet will hold one dozen cookies (3 cookies vertically x 4 cookies horizontally).

Bake for 6 minutes and rotate the pan. Check for doneness is 5 more minutes. 

If cookies still appear puffed and moist, continue to cook for at least another minute. They are technically finished after the cookies fall a bit, and the exterior of the dough looks dry.  You can continue to bake to desired darkness. When cooled, the lighter cookies will be brown around the edges with a soft and chewy center, and the darker will yield a more uniformly caramelized and crispy treat. (All shades are delicious, and I often cook each sheet pan differently, on purpose, knowing that people have different preferences.)

Store in an airtight container, or in the fridge for up to one week.

If you don't need all the cookies at once, you can flash freeze the unbaked dough. To do this, portion the dough onto a cookie sheet. There is no need to allow space in between them since you are not baking them. Freeze for an hour, or until they are solid. Then they can be transferred to a freezer bag to save room.

When ready to bake, bring to room temperature, generally about twenty minutes. Flatten each scoop gently with your fingers to about 2/3 inch thick and proceed with baking as directed.
 
Yield: Three+ dozen 

Revised from my original recipe published April 19, 2011